With Schlieren photography, even a person’s breath can be captured. It is often used to illustrate various flows, shockwaves, bullets, flames, and fire propagation. NASA has even developed a version of the method that allows supersonic aircraft to be photographed in flight. Most people have probably seen such images before — in recent years, the technique has also become popular among amateurs on the internet. Its use in art is rare, even though the method itself is not particularly complex.
The Schlieren method is widely used in aerodynamics, ballistics, fluid dynamics, and in the study of gas and liquid mixing, as well as convective heat transfer. It is commonly believed that the technique was developed in 1864 by German chemist and physicist August Toepler to study supersonic motion. In reality, however, it was invented earlier, in 1859, by French physicist Léon Foucault—famous for his pendulum—to inspect the glass of telescope mirrors and optical lenses. Toepler later refined the method and was the first to use it for observing shockwaves. The phenomenon itself had been noticed much earlier by Robert Hooke, but he couldn’t photograph it—since photography hadn’t been invented yet in 1665.
This method can visualize the flow and vortices of any transparent medium that undergoes a change in optical refractive index due to some influence. Such influences may include pressure (shock or sound waves, vortices), temperature changes, or even concentration differences in mixtures or solutions. These cause inhomogeneities in the medium, which are usually invisible to the human eye—although anyone who has watched a sugar cube dissolve in tea has likely seen something similar. As the cube breaks apart, denser streams of sugar flow into the tea. These are colorless but appear as hazy currents. The dense sugar solution significantly alters the refractive index, which is why we can see it. In summer, shimmering hot air above asphalt roads causes a similar effect. The shockwave around a bullet or the warm air exhaled from a person’s mouth also creates optical disturbances, but they are so subtle that we normally can’t see them. However, if these differences could be compared to a reference, they could be amplified.


“Schlieren” is a German word meaning “streaks” or “striae”; in optics, it generally refers to any kind of inhomogeneity that causes localized, abnormal deflection of light. But how can such invisible disturbances be photographed? Well, it’s probably easiest to understand this using the classic two-mirror Schlieren setup.
Standard Z-configuration
As shown in the accompanying diagram, a roughly point-like light source illuminates a concave mirror, which collimates (makes parallel) the light rays. The mirror is tilted slightly, so the more or less collimated beam is directed toward the test object. The beam passes around the object and reaches a second mirror, which focuses the beam onto the edge of a razor blade. Behind the blade, either a camera is placed or a lens that projects the image onto a screen. The light path forms a characteristic flat Z-shape, which is why this is often called the “Z-configuration.”
Now, as long as the light travels “normally,” the image of the light source falls exactly on the edge of the blade. The blade blocks about half of the light; the rest reaches the screen. If there is nothing between the mirrors, the screen or the camera sensor will just show a uniformly bright, slightly gray patch. But if a light ray is deflected slightly due to a local fluctuation in the refractive index, two things can happen. One: the ray hits the blade and does not reach the screen—so a dark shadow appears. Two: more light passes by the edge of the blade, making that part of the image brighter.
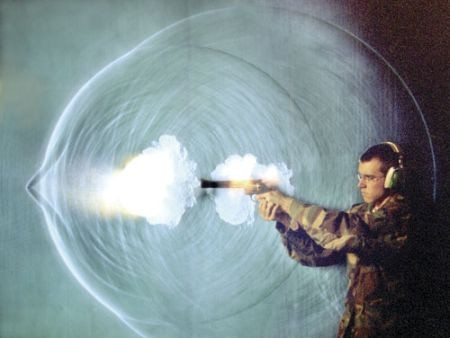
In the current setup, within the Schlieren field (the area between the mirrors), the regions that deflect light to the left will appear brighter, while those that deflect it to the right will appear darker. The blade can be positioned horizontally, vertically, or diagonally, and each orientation produces a different result. For visualizing flames or breath, a vertical blade gives better contrast, since hot gases rise upward.
Many guides recommend a point light source, but it is often more advantageous to use a slit-shaped source, as it provides more light and results in a brighter image. One challenge, however, is that the slit must be precisely aligned to run parallel to the razor blade’s edge.
It’s also worth noting that if, instead of a blade, you use colored filters (two filters of different colors, or a striped color filter), the Schlieren image becomes colored. But for this, thin color filters are needed—standard photographic glass filters can cause ghosting in the image.

Single-Mirror Method
Experience shows that the two-mirror setup produces more detailed and higher-contrast images, but Schlieren photography can also be done with a single mirror—which is a significant advantage in terms of cost. Only high-quality spherical mirrors can be used (such as telescope mirrors), with a focal length of around 1000 mm or more, and a diameter of at least 15–20 cm.
If a spherical mirror is not available, a parabolic one will also work, though it provides less uniform illumination across the image. The larger the diameter of the mirror, the better, since the mirror size limits the size of the objects that can be photographed.
Shaving mirrors are completely unsuitable: not only are they distorted and uneven, but their focal length is also far too short (about 300 mm). Another issue is that in shaving mirrors, the reflective coating is on the back of the glass, causing double reflections and a ghosted image. What’s needed here is a front-surface mirror—one that is aluminized on the front side.

In the single-mirror method, both the light source and the knife edge must be placed at twice the focal length from the mirror, so that the image of the light source falls directly onto the knife edge. Ideally, both the knife edge and the light source would occupy the same position on the optical axis of the mirror—but in that case, the light source would block the view, and the image couldn’t be photographed. Therefore, the light source must be shifted a few centimeters to the side, so that the mirror projects its image just beside it. The smaller this offset, the better, since it introduces astigmatism. (It’s worth noting that this is also why the Z-configuration must be relatively flat, although in that case symmetry somewhat compensates for the distortion.)
The light source can be a bright LED lamp fitted with a suitable mask. For photography, a macro or telephoto lens with a focal length of 100–200 mm can be used, possibly with extension tubes if needed. Focus should be set just in front of the mirror, because that’s where the Schlieren field is now located. Since the light is not collimated, only a relatively small space in front of the mirror can be effectively used. The lens should be adjusted so the mirror fills the frame.
It’s extremely important that everything—camera, mirror, light source, and object—be mounted solidly and vibration-free. Vibrations will ruin the image! A good solution is to mount the knife edge, light source, and camera together on a single base, minimizing any relative movement. The “knife edge” can be a simple razor blade; the key is that it must be sharp, as any thickness will scatter the light.
A high-quality concave mirror is not cheap—the type needed here costs at least 80,000–100,000 forints (~200–250 EUR). So one may ask: why not use a lens instead of an expensive mirror? Well, actually, you can. If you have a lens with a diameter of 15–20 cm and a focal length of 30–100 cm (i.e., 3 to 1 diopters), you can “straighten out” the setup. Arrange everything in a line: place the lens about 2×f from the light source; put the test object just behind the lens; position the knife edge about 2×f beyond the lens, with the camera placed behind the knife. This setup works—but it will also reveal the lens’s own optical imperfections and will cause very strong chromatic aberration.
I haven’t tested it yet, but it would be interesting to try this with a monochromatic light source, such as a green laser. Amateur experimenters online often report poor results with lasers and monochromatic light, but that may not be due to the light itself—professional Schlieren systems using lasers do exist and work well.
An Even Cheaper Solution
If someone just wants to experiment and is willing to sacrifice image quality for cost savings, they can use two A4-sized plastic sheet magnifiers. These can be purchased for around 2,000–3,000 forints (~5–8 EUR). A sheet magnifier is a special type of converging lens known as a Fresnel lens—a step lens made of concentric ridges. Incidentally, the French physicist Augustin-Jean Fresnel invented it specifically to replace large concave mirrors—not for photography, but for lighthouse lamps.
It works just like a traditional convex magnifying lens, but the trick is that Fresnel mentally sliced a massive lens into concentric rings and eliminated the unnecessary bulk, compressing the refracting surfaces into a flat plane. The result is a large, yet lightweight lens with concentric grooves matching the curvature of the original convex surface.
Due to their ringed structure, Fresnel lenses produce slightly poorer images than equivalent homogeneous lenses and have significant distortion—but they are widely used wherever large, lightweight lenses are needed: for example, as collimators in projectors, in headlights, as light concentrators in front of photovoltaic cells, or in motion-sensing alarms.
For Schlieren photography, Fresnel lenses are far from ideal compared to mirrors—but for casual experimentation, they’re just good enough. The sheets can be set up 40–50 cm apart, as shown in the diagram. The light source should be placed at the focal point of the first lens, and the knife edge at the focal point of the second lens. Between the two lenses, the light is approximately collimated.
The system functions essentially the same way as the two-mirror Z-configuration, except that there’s no reflection—the light travels straight through the setup.


Photoshop Trick
The cheapest and most low-effort method of all is to use Photoshop. Start by creating a blank, cropped A4-sized image—say, at 150 dpi resolution and in grayscale mode. Then, use the Filter / Noise / Add Noise function to fill it with 200% Gaussian noise. This will produce a “speckled” image that resembles an old TV screen during a broadcast blackout. Print this image onto a piece of cardboard. The cardboard will serve as the background; place your object (e.g., a candle) in front of it, and mount your camera on a tripod. As a light source, direct sunlight works perfectly—especially if it’s bright and strong. Make sure the sun shines from behind the camera.
Now take two photos: one with the object in the scene (e.g., a burning candle), and one without it—just the background. It’s crucial that nothing moves between the two shots, especially not the camera. Switch to manual focus and turn off image stabilization to prevent the lens from shifting, and ensure that both images are taken with exactly the same settings. A telephoto lens works well for this setup. Focus should be adjusted so that both the object and the background are sharp—ideally beyond the hyperfocal distance. The camera should be placed as far from the subject as possible, while the subject and background should be as close together as possible.
Once both images are captured, load them into Photoshop and stack one on top of the other as two layers. In the Layers panel, set the blending mode of the top layer to Difference—this causes Photoshop to subtract one image from the other. Where the two images are identical, the difference is zero (i.e., black); only the differences will appear. Now use the arrow keys to nudge the top layer pixel by pixel—up, down, left, or right—until most of the image turns black. In theory, if you align the two noisy patterns perfectly, everything disappears except where the image was distorted due to refractive index anomalies. In other words, the Schlieren pattern appears. You can enhance it further by adding a Curves adjustment layer to increase the contrast.

This trick can also be done with a mobile phone—there’s an Android app on GitHub that does exactly this: https://github.com/kambara/air-visualizer. The method is known as background-oriented Schlieren (BOS) technique. While it’s not as sensitive as other Schlieren methods, it has the advantage of requiring no optical components besides a camera. The image quality largely depends on the quality of the background.
NASA has developed a similar method for photographing aircraft—in their case, they use the desert near Edwards Air Force Base as the background. One of the challenges with BOS techniques is that the background and the subject are not at the same distance, and in low-light conditions, the aperture cannot be stopped down too much.
That said, there’s still room for innovation in this area. A few years ago, researchers at MIT proposed using a lenticular sheet (a surface covered with thousands of tiny spherical lenses) instead of a flat 2D background. This allowed them not only to encode spatial and angular information, but—according to their claims—also to reduce the impact of focus disparity. The technique requires no knife edge and can theoretically be used even handheld, with LED or OLED backlighting. The paper describing this approach is available here:
https://dspace.mit.edu/handle/1721.1/79911