Fluorescent lamps are becoming less and less fashionable these days, as LEDs are pushing them out—but they’re really not that bad. The technology improved a lot between the 1970s and 1990s: the unpleasant light of old fluorescent tubes is a thing of the past. Flickering and color distortion have been reduced so effectively that in places where color accuracy matters—like graphic design studios, sewing workshops, and so on—it’s still often better to use high-quality fluorescent lighting instead of LEDs.
Compact Fluorescent Lamps (CFLs) Are a Different Story
CFLs were developed in response to the 1973 oil crisis by engineers at General Electric and Philips. At first, the idea seemed promising—a fluorescent tube that could be screwed into a traditional light bulb socket. But then the problems became apparent: reduced brightness over long-term use, slow warm-up resulting in low light output for several minutes after switching on, and electronic failures due to overheating, among others.
A CFL’s luminous efficacy is around 50–70 lumens per watt, which is much better than that of a traditional incandescent bulb (10–15 lm/W). But because they were so dim at startup, people often bought higher-wattage CFLs, negating the energy savings. They also required more materials and energy to manufacture and were more expensive, so in hindsight, we didn’t actually gain much from them. Still, since manufacturers had already invested heavily in development, they used good marketing to push them onto consumers to make a profit.
Now Back to Traditional, Long Fluorescent Tubes
The EU’s Directive 2005/32/EC on eco-design, implemented through Regulation 245/2009/EC, which banned the sale of incandescent lamps, also affects fluorescent tubes. Since April 2012, T12 tubes can no longer be sold, and as of August 2023, T5 and T8 tubes can only be sold if they come from already-manufactured stock.
These tubes have a luminous efficacy of 60–110 lumens per watt. For comparison, older LED lamps had an efficacy of 75–125 lm/W, while newer ones range between 130–220 lm/W. So older LEDs were roughly on par with fluorescent tubes, yet they were marketed as vastly superior—mainly by highlighting their supposed longer lifespan.
The lifespan of modern fluorescent tubes is mainly limited by cathode corrosion, typically ranging from 7,000 to 15,000 hours, though some figures go as high as 90,000 hours (a standard incandescent bulb lasts about 800–1,000 hours). Initially, LEDs were said to last 10,000–15,000 hours (though no one mentioned that fluorescent tubes could also last that long), and some manufacturers promised up to 30,000 hours. Today we know that in practice, you’re lucky if LEDs last 2,000–4,000 hours. This is typically not due to the LED itself, but rather the poor-quality electronics made from substandard components.
It’s true that newer LEDs can produce the same amount of light with half the energy compared to a fluorescent tube. However, they require more materials and energy to manufacture, and their electronics often fall short of delivering the promised lifespan. I’ve found numerous studies claiming that LEDs are about 80% more efficient, but these all considered only the energy used during operation. I’ve yet to come across a study analyzing the entire product life cycle—from manufacturing through use to disposal—but I strongly suspect LEDs wouldn’t come out on top.
Fluorescent tubes are simpler and cheaper to manufacture, and they’re easier to recycle than the electronic waste generated by LEDs. On the downside, fluorescent tubes contain mercury. Mercury is the boogeyman of heavy metals—if it escapes into the environment (where, incidentally, some naturally occurring mercury is present), we’re all doomed! Of course, mercury could be collected selectively, recovered, and its careless disposal could be heavily penalized.
But that’s not even the real issue. The real problem is that thanks to humankind’s wonderful stewardship, the available global mercury reserves are running out. Mercury hasn’t vanished from the Earth—it’s just that all the easily accessible sources have already been mined, and we’ve scattered it across lakes, rivers, and seas.
Markings
The diameter of fluorescent tubes is standardized. The letter “T” (for tube) is followed by a number that indicates the diameter in eighths of an inch (1/8 inch = 3.175 mm). For example, a T8 tube has a nominal diameter of 2.54 cm, while a T12 is 3.81 cm. The lengths of the tubes and the configuration of their ends—including the spacing of the pins—are also standardized. Common lengths for T8 tubes include 438, 590, 895, 1200, and 1500 mm. T8 tubes fit into the same sockets as older T12 tubes and can be used to replace them.
How a Fluorescent Tube Works
Inside a fluorescent tube, there’s a mixture of noble gases (argon, xenon, neon, or krypton) and mercury vapor. The internal pressure is low—about 0.003 atmospheres. When the lamp operates, a gas discharge takes place: free electrons are accelerated and collide with mercury atoms, exciting them. As these excited atoms return to their ground state, they emit the excess energy as photons. These photons have energies between 2.5 and 5.5 electron volts, so the tube emits mostly ultraviolet (UV) light, with very little visible light.
The UV radiation strikes the inner surface of the tube, which is coated with a white fluorescent phosphor. This phosphor layer emits visible light when excited by UV, and that’s what we see as useful illumination. About 45% of the UV light is converted to visible light; the rest turns into heat. The color of the light depends on the composition of the phosphor.
When powered by alternating current from the mains, the plasma flickers at 100 Hz (twice the mains frequency). However, this flickering can be virtually eliminated by using phosphors with a long afterglow time (>1 second).
Once ignited, the plasma remains stable as long as the current doesn’t fall below a certain critical threshold—and even persists briefly afterward. That’s why fluorescent tubes can run on alternating current. The operating voltage of a fluorescent tube is only 40–150 volts (depending on tube length and temperature), and the plasma has a negative differential resistance—meaning the more current flows, the better it conducts.
This would make the tube’s operation unstable: the current would keep rising until the tube destroyed itself. Therefore, the current must be limited. Traditionally, this is done with a ballast coil (also called a choke), marked with the letter “G” in diagrams.

To initiate the gas discharge, there must be a sufficient number of free electrons in the gas. This is achieved using thermionic emission: standard fluorescent tubes are equipped with tungsten filament electrodes coated with alkaline earth metal oxides. These filaments are heated by an electric current during startup, causing them to emit electrons. The ignition voltage in this phase is typically between 100 and 300 volts.
Rapid Start
A traditional fluorescent starter (marked C in diagrams) contains a glow lamp (D) with a bimetallic thermal switch and a suppression capacitor (E). When the light is switched on, a gas discharge occurs in the neon-filled glass capsule of the glow lamp. The heat from the discharge causes a bimetal strip to bend, closing the circuit. This shorts out the glow lamp (which then goes out) and also short-circuits the fluorescent tube itself.
At this point, current flows through the filaments (F) of the tube, preheating the cathodes. Meanwhile, the bimetal cools down and quickly snaps back to its original position, breaking the circuit. This sudden interruption causes the ballast coil (G) to generate a high-voltage pulse, which ignites the tube (A), initiating the gas discharge inside.
Once the conducting plasma forms, it is self-sustaining, and the cathode heating is no longer needed. Because the operating voltage of the tube is too low to reignite the glow lamp in the starter, no further ignition attempts are made. The ignition process takes about 0.5 to 1 second.

For long fluorescent tubes, in order to initiate plasma discharge, the tube must be installed near a grounded metal surface. This allows the discharge to propagate along the entire length of the lamp via capacitive coupling. The grounded metal can be the fixture’s own housing or a metal strip approximately 2 cm wide placed inside the housing, no more than 1–1.5 cm away from the tube. In some cases, this starting aid is a conductive coating or foil applied to the outside of the tube’s glass envelope. Proper grounding is essential—without it, ignition may not occur.
In lamps equipped with electronic ballasts, there is no separate starter; ignition is handled by the electronics. Electronic ballasts ignite the tubes either using the previously described rapid-start method, instant-start, or programmed soft-start techniques.
Instant Start
Instant start is used to ignite cold-cathode (filamentless) tubes—such as those used in monitor backlighting, illuminated signs, and emergency lighting—but T8 and T12 tubes can also be started this way. Cold-cathode tubes lack filaments; their cathodes are made from plain metal plates without any special coating, which results in less electrode wear.
Hot-cathode lamps can also be started with the instant-start method. In this case, a small heating current is used—just enough to vaporize the mercury. The electronics generate a high-voltage pulse (around 600 volts) to ignite the tube. The tube lights up immediately, though it appears dim for a few seconds until the gas heats up, the mercury fully vaporizes, and better ionization occurs—at which point the tube reaches full brightness.
The advantage of this method is its low starting current, which makes it slightly more energy-efficient, requires simpler electronics, and allows the use of thinner wiring. The downside is that the voltage surge during ignition significantly reduces the tube’s lifespan—often by about half. For this reason, it’s mainly used in places where lamps are not switched on and off frequently, such as offices.
Note: With rapid-start tubes, ignition can sometimes fail if the tube is dirty or dusty on the outside. In that case, the tube should be cleaned with lukewarm water and dish soap, dried thoroughly, and allowed to air dry. (Caution: tubes are fragile!)
Programmed Start (Soft Start)
In programmed start, the filaments are gradually preheated with a controlled current before applying high voltage to ignite the tube. In typical household use, this method can increase tube lifespan by a factor of 3–4. However, ignition takes longer—about 2 to 4 seconds. This approach requires more complex electronics, but it greatly extends the service life of tubes in environments where lights are frequently switched on and off (e.g., motion-sensor stairwell lighting or public restrooms).
High-Frequency Ballasts
Since the 1990s, high-frequency electronic ballasts have been in use. Instead of operating at the standard 50 Hz mains frequency, these drive the tubes at 10–20 kHz. This not only eliminates flickering but also improves the tube’s luminous efficacy by about 10–15%. However, these ballasts supply the tube with voltages around 600 volts, which calls for extra attention to insulation when designing the lamp fixture.
Is the Fluorescent Tube Still Good?
At a glance, it’s often difficult to tell whether a fluorescent tube is still working properly. In most cases, fluorescent tubes fail due to cathode corrosion: the cathode coating disintegrates over time, and some of the material deposits on the inner wall of the tube, forming a darkened or blackish coating.

If you see dark discoloration near the ends of the tube, it likely means the tube is burned out—but this is not always a sure sign! The best way to check is to place the tube in a working fixture, replacing a known good tube, and see if it lights up.
Another common issue is that the mercury inside the tube gets absorbed by the glass and the phosphor coating over time, leaving the gas mixture mercury-deficient. In such cases, the tube will light up more slowly when switched on, initially appearing dim and pinkish—this is because only the argon is emitting light at first. (In used tubes, up to 99% of the mercury ends up bound in the phosphor coating, which actually makes recycling easier.)
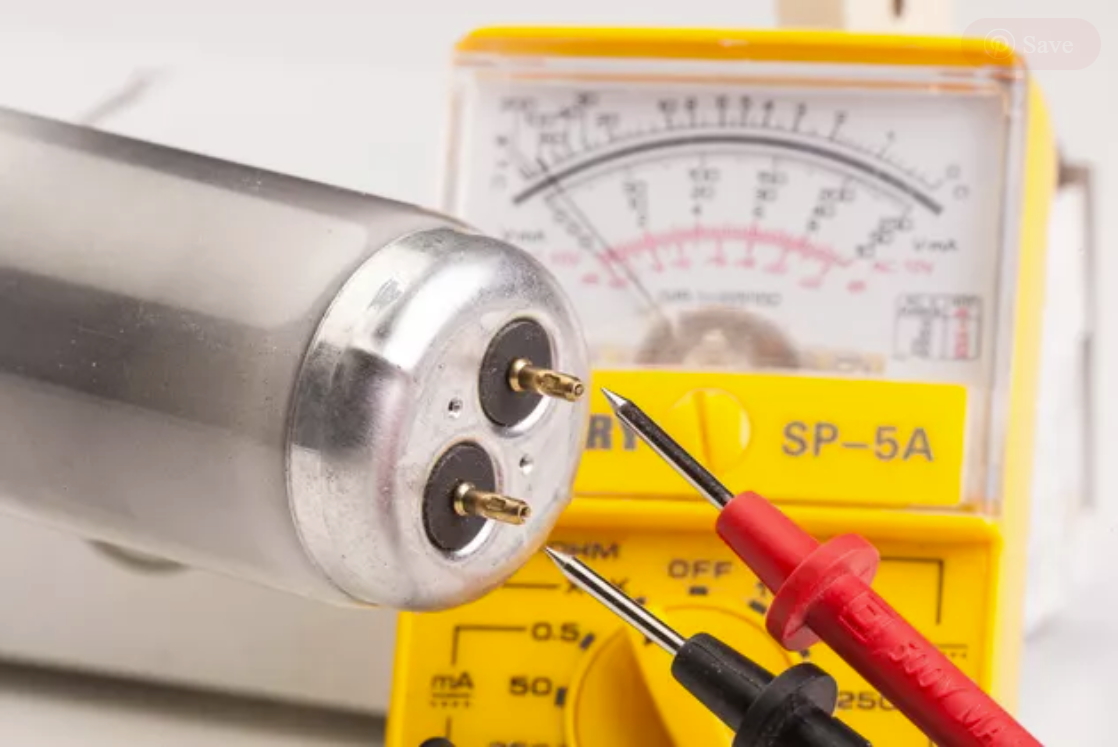
You can also test the filaments with a multimeter, which can give you a clue. Measure the resistance between the two pins at each end of the tube. If you get a reading of about 0.1 to 5 ohms, the filament is intact. If powered with about 7–9 volts and drawing around 0.5 amps, the filament should visibly glow.
Of course, working filaments don’t guarantee that the tube is good—but if either filament is broken, the tube is definitely bad.

Malfunctions
Troubleshooting fluorescent lamps can be challenging, since the fault may lie with the tube itself, the ballast, or the starter—and it’s not always obvious which one is to blame. In 90% of cases, the tube needs to be replaced. The simplest method is to test the suspect tube in a known working lamp. In fixtures with two tubes, it’s generally advisable to replace both, even if only one has failed.
The tube doesn’t light up, and there is dark discoloration at the ends:
The tube is most likely burned out and should be replaced with one of the same size and wattage.
The tube doesn’t light up, and shows no signs of life:
- No power: Use a multimeter or voltage tester to check for power. If there’s no power, check the fuse, wiring, and wall switch. If you can’t find the issue, consult an electrician to inspect the household wiring.
- Faulty wiring: Check all wiring connections to ensure they are not loose or disconnected.
- Poor contact in the socket: Try rotating or removing the tube. Inspect the contacts—if they are oxidized, clean them with a wire brush or steel wool. Also inspect the socket itself; if it shows signs of discoloration, heat may have bent the contacts. (After disconnecting power, use pliers to gently bend them back into place.)
- Ballast test: If a non-contact voltage tester shows voltage near the tube ends, the ballast is likely working. You can also use a multimeter to check voltage across the tube (see below).
- Burned-out tube: If a filament is open (as tested with an ohmmeter), the tube is burned out and must be replaced with one of the same size and wattage.
With a traditional magnetic ballast:
- The tube doesn’t light, and the starter is blinking: The starter is repeatedly attempting to ignite the tube. The tube is faulty and should be replaced.
- The tube glows faintly at the ends but stays dark in the center: This indicates a faulty starter. The bimetal switch inside may be stuck closed, causing the cathodes to glow red but preventing ignition. Replace the starter as soon as possible—this condition can damage the tube. Be sure to use a starter rated for the tube’s wattage.
The starter is usually a small cylindrical component, ~2 cm in diameter and ~4 cm long, located near or under the tube. Remove it by twisting it counterclockwise about 60 degrees. - The tube hums or glows weakly, and there’s a smell of burnt insulation: The ballast coil may have a shorted winding (not detectable with an ohmmeter). Replace the ballast with one rated for the correct wattage.
- The tube flickers: Possible causes include low mains voltage, a faulty tube, or a defective ballast.
- The tube turns off and back on periodically: This may be due to low ambient temperature. Often the problem resolves itself after a few hours of operation. If not, check whether the tube is rated for the room’s temperature.
With an electronic ballast:
Electronic ballast failures are harder to diagnose than traditional ones. Tubes generally don’t flicker during startup, and the electronics attempt ignition only briefly when power is first applied. If the tube doesn’t ignite, the ballast stops trying automatically.
- The tube doesn’t light: In most cases, the tube is faulty. Replace it with a known good one. If it lights, the problem is solved; if not, further troubleshooting is needed.
- The tube is good but the lamp still doesn’t work: Disconnect the power, remove the cover, and visually inspect the wiring. Look for discoloration, burn marks, or damage to wires and ballast. Check connections for looseness.
- If no visible damage is found, measure voltage across the tube:
- Ignition voltage: Remove the tube. Set your voltmeter to a 1000 V AC range and connect it to the tube socket.
- Instant-start: 400–700 V
- Other types: 100–200 V per tube
- Cathode heating:
- Instant start: 3.5–4.5 V across the pins at each end
- Rapid or soft start: up to 9–15 V
- Current draw:
- Rapid/soft start: 0.4–0.8 A
- Operating current typically: 0.3–0.4 A
- Ignition voltage: Remove the tube. Set your voltmeter to a 1000 V AC range and connect it to the tube socket.
If there’s no measurable voltage at the sockets, but wiring and power supply are OK, the ballast must be replaced.
- The tube turns off cyclically: It lights for a while, then turns off, and after a few minutes it lights again. This may be caused by overheating. Some electronic ballasts shut down when overheated and restart once cooled. This can be due to ambient heat (e.g. summer heatwaves) or a failing ballast.
In many cases, a new electronic ballast can cost as much—or even more—than a brand-new light fixture, so replacing it may not be worth it economically.